Seeeduino XIAOで「学校のチャイム」をタイマー制御してみる:チャイム演奏
ガチャポンで入手した「学校のチャイム」をタイマー制御するために始めましたが「ガチャポンなくても自前(Arduino)で演奏すれば良いやん!!」に思い至りましたので… (*´Д`)自前演奏とガチャポンスイッチONの両方に対応してみました。
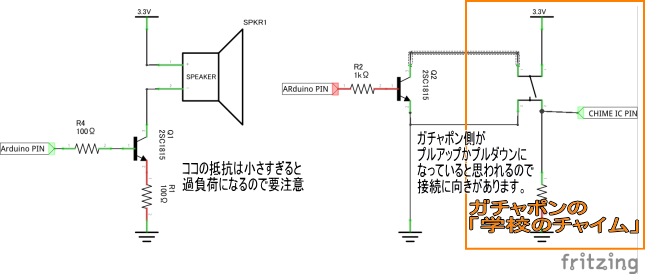
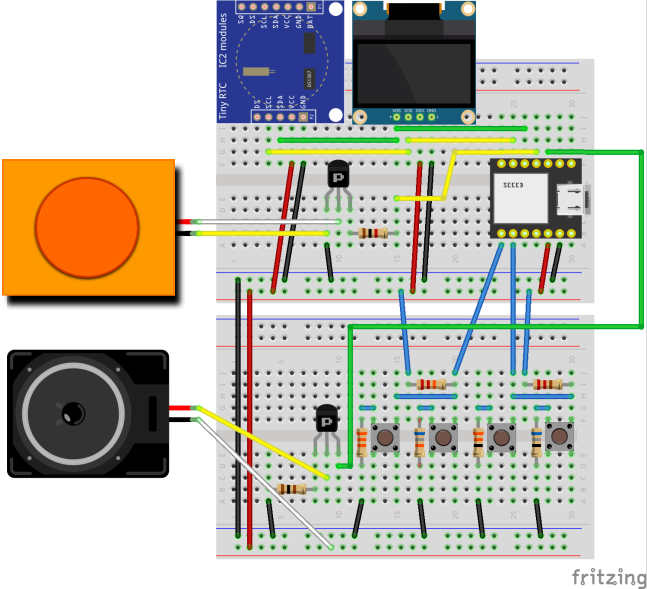
スピーカーの接続
前回までの回路にスピーカー&ガチャポンスイッチを付け足します。ガチャポンスイッチの方はLチカと一緒なので深く考える事はありません。
多分、ガチャポン側に極性があるので接続する向きに注意が必要かもです。
自前演奏の方は学校のチャイム(ウエストミンスターの鐘)の楽譜が簡単に見つかりますし、Tone関数で演奏するソースが公開されていたので有難くパクりました。


チャイム確認プログラム
ボタン1で内蔵チャイム、ボタン2でガチャポン「学校のチャイム」がなります。
#include
#include

// ボタン
#define BTN0_PIN 7
#define BTN1_PIN 8
#define SPK_PIN 2
#define CHIME_PIN 1

unsigned char buttonStat ;    // ボタンの状態: BTN1=0x01 BTN2=0x02 BTN3=0x10 BTN4=0x20
unsigned char buttonStatPre ; // ボタンの状態 - 前回取得時
unsigned char btn ; // ボタンが押された 1-4

// RTC デバイスアドレス(スレーブ)
byte RTC_ADDRESS = 0x68;  // 2進数 1101000

// RTCのレジスタテーブル(8byte)
int RegTbl[8];
int i;

// 表示用Buffer
char dispStr[20] ;
static char *youbi[] = {"Sun","Man","Tue","Wed","Thu","Fri","Sat" } ;

// ボタンの状態をチェック
void checkButton( ) {
  int button0Stat ; // ボタン1・2の状態
  int button1Stat ; // ボタン3・4の状態

  buttonStat = 0 ;
  button0Stat = analogRead(BTN0_PIN) / 100 ;
  button1Stat = analogRead(BTN1_PIN) / 100 ;
  if (button0Stat == 6) buttonStat |= 0x01 ;
  if (button0Stat == 8) buttonStat |= 0x02 ;
  if (button0Stat == 5) buttonStat |= 0x03 ;
  if (button1Stat == 6) buttonStat |= 0x10 ;
  if (button1Stat == 8) buttonStat |= 0x20 ;
  if (button1Stat == 5) buttonStat |= 0x30 ;

  btn = 0 ;
  if ((buttonStat & 0x20) != 0 && (buttonStatPre & 0x20) == 0) {
    btn = 4 ;
  }
  if ((buttonStat & 0x10) != 0 && (buttonStatPre & 0x10) == 0) {
    btn = 3 ;
  }
  if ((buttonStat & 0x02) != 0 && (buttonStatPre & 0x02) == 0) {
    btn = 2 ;
  }
  if ((buttonStat & 0x01) != 0 && (buttonStatPre & 0x01) == 0) {
    btn = 1 ;
  }
  buttonStatPre = buttonStat ;
}

// 2進化10進数(BCD)を10進数に変換
byte BCDtoDec(byte value) {
  return ((value >> 4) * 10) + (value & 0x0F) ;
}

void setup(){
  pinMode(SPK_PIN, OUTPUT);
  pinMode(CHIME_PIN, OUTPUT);


  // ===== RTCの初期化 =====
  // マスタとしてI2Cバスに接続する
  Wire.begin();

  // I2Cスレーブに対して送信処理を開始する
  Wire.beginTransmission(RTC_ADDRESS);

  // レジスタのアドレスを指定する(0-63の内、先頭から)
  Wire.write(0x00);

  // ---------------------------------
  //  タイマーキーパーレジスタ
  // ---------------------------------
  // 2進化10進数(BCD)で指定します。

  // [00]Seconds(56秒)
  Wire.write(0x56);
  // [01]Minutes(34分)
  Wire.write(0x34);
  // [02]Hours(12時)
  Wire.write(0x12);
  // [03]Day(火)
  // 1:日 2:月 3:火 4:水 5:木 6:金 7:土
  Wire.write(0x03);
  // [04]Date(26日)
  Wire.write(0x26);
  // [05]Month(01月)
  Wire.write(0x01);
  // [06]Years(2021年)
  Wire.write(0x21);

  // I2Cスレーブへの送信完了
  Wire.endTransmission();

  // OLEDの初期表示
  oled.init();                      // Initialze SSD1306 OLED display
  oled.clearDisplay();              // Clear screen
  oled.setTextXY(0,2);              // Set cursor position, start of line 0
  oled.putString("-----------");
  oled.setTextXY(1,2);              // Set cursor position, start of line 1
  oled.putString("Hello World");
  oled.setTextXY(2,2);              // Set cursor position, start of line 2
  oled.putString("-----------");
}

void internalChime()
{
    tone(SPK_PIN, 698);
    delay(800);
    tone(SPK_PIN, 880);
    delay(800);
    tone(SPK_PIN, 784);
    delay(800);
    tone(SPK_PIN, 523);
    delay(2300);
    noTone(SPK_PIN);
    delay(100);

    tone(SPK_PIN, 698);
    delay(800);
    tone(SPK_PIN, 784);
    delay(800);
    tone(SPK_PIN, 880);
    delay(800);
    tone(SPK_PIN, 698);
    delay(2300);
    noTone(SPK_PIN);
    delay(100);

    tone(SPK_PIN, 880);
    delay(800);
    tone(SPK_PIN, 698);
    delay(800);
    tone(SPK_PIN, 784);
    delay(800);
    tone(SPK_PIN, 523);
    delay(2300);
    noTone(SPK_PIN);
    delay(100);

    tone(SPK_PIN, 523);
    delay(800);
    tone(SPK_PIN, 784);
    delay(800);
    tone(SPK_PIN, 880);
    delay(800);
    tone(SPK_PIN, 698);
    delay(2300);
    noTone(SPK_PIN);
    delay(100);
}

void loop() {
  // =====  時刻取得 =====
  // レジスタのアドレスを先頭にする
  Wire.beginTransmission(RTC_ADDRESS);
    Wire.write(0x00);
  Wire.endTransmission();

  // I2Cスレーブに8byteのレジスタデータを要求する
  Wire.requestFrom(RTC_ADDRESS, 8);

  // 8byteのデータを取得する
  for (i = 0; i < 8; i++) {
    while (Wire.available() == 0 ) {}
    RegTbl[i] = Wire.read();
  }

  // ----- 現在日時 表示 -----
  sprintf(dispStr,"%04d/%02d/%02d %s",
    BCDtoDec(RegTbl[6]) + 2000,     // 年
    BCDtoDec(RegTbl[5] & 0x1F),     // 月 1~12
    BCDtoDec(RegTbl[4] & 0x3F),     // 日 1~31
    youbi[(RegTbl[3] & 0x07)-1]) ;  // 曜日 (1~7)-1
  oled.setTextXY(4,1);
  oled.putString(dispStr);

  sprintf(dispStr,"%02d:%02d:%02d",
    BCDtoDec(RegTbl[2] & 0x3F),   // 時
    BCDtoDec(RegTbl[1] & 0x7F),   // 分
    BCDtoDec(RegTbl[0] & 0x7F)) ; // 秒
  oled.setTextXY(5,2);
  oled.putString(dispStr);

  // ----- チャイムを鳴らす -----
  checkButton( );
  if (btn == 1) {
    oled.setTextXY(6,0);
    oled.putString("INTERNAL CHIME");
    internalChime() ;  // INTERNAL CHIME PLAY
  } else
  if (btn == 2) {
    digitalWrite(CHIME_PIN, HIGH); // EXTERNAL CHIME ON
    oled.setTextXY(6,0);
    oled.putString("EXTERNAL CHIME");
  } else {
    digitalWrite(CHIME_PIN, LOW);  // EXTERNAL CHIME OFF
    oled.setTextXY(6,0);
    oled.putString("              ");
  }

  delay(100) ;
}
----- ▼ MP4動画 「ブロックされているコンテンツを許可」 しないと見えないかも -----
-----
