M5Stamp PICOで 1:n のTCP/IP通信
Wi-Fi アクセスポイントに設定したM5Stamp PICOに、複数(今回は2台)のM5Stamp PICOを接続してTCP/IP通信でメッセージを送信する実験を行います。屋外に置いた気温・気圧センサーの情報を屋内で表示する事を想定していますが、初期実験なので、まずは情報の送信手順の確認のみです。
クライアント側のLEDの状態をサーバに送信して、サーバ側のLEDを点灯する「リモートLチカ」を試してみます。
ArduinoIDEの設定・スケッチの書き込み
M5Stamp PICOの使い方は各ページを参照・ArduinoIDEの設定
・スケッチの書き込み
Internet通信
Internet通信はザックリ4階層のレイヤを通して行われます。(実際にはもう少し細分化される)HTTPは1コネクト1リクエスト(1回の接続で、1回だけリクエストを送信、応答を受信したら切断)のルールなので
1対1で使用する場合には都合の良いプロトコルのように思えます。
サンプルもHTTP接続ばかりなのでHTTPを使わせたいのかな…
| アプリケーション層 | HTTPなど、TCP/IPプロトコルを使って構築されるアプリケーション HTTPの通信手順はRFC(Request For Comments)で決められている。 RFCはIEEEやISOとは異なり、厳密な規格ではないので割といい加減だったりする。 ESP32ではHTTP(Hyper Text Transfer Protocol)を使うためのライブラリが用意されている。 HTTPを使わせたい雰囲気が・・・ |
|---|---|
| TCP層 | TCP(Transmission Control Protocol)はIP(Internet Protocol)を使って構築される。 誤り訂正や再送要求などを行う。 |
| IP層 | IPアドレスを使用したパケットの転送を行う |
| ネットワーク層 | MACアドレスを使用して、有線や無線で接続された接続先とデータの送受信を行う |
アクセスポイント(通信サーバ)
M5StampをWiFiアクセスポイントに設定します。M5Stackライブラリの WiFiAP.h で定義されている WiFi.softAP(ssid, password) を使用します。
SSIDとパスワードを指定してsoftAPをコールするだけでWiFi APポイントが開設出来ます。
※ <>を全角<>に置き換えています。コピペの際は注意してください。
#include <WiFi.h>
#include <WiFiAP.h>

const char *ssid = "STAMP-PICO";
const char *password = "STAMP-PICO";

void setup() {
  WiFi.softAP(ssid, password);
}

void loop() {
}
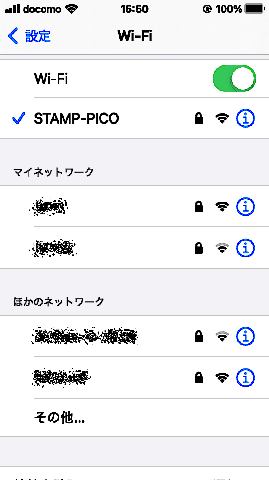 このスケッチを動かすと アクセスポイント
 STAMP-PICO に接続できるようになります。アクセスポイントに接続できるだけ未だ通信は出来ません。
ネットワーク層同士の通信が出来るようになった状態
WiFi.softAPIP() でIP層での通信に必要なIPアドレスを割り当てます。
通信ポートは80番(HTTP通信に割り当てられているポート)を使用します。
無指定だと何処に割り当てられるか不明で不便ですので、WiFi.softAPConfig()で明示的にIPアドレスを割り当てます。
アドレスとして指定できるのはプライベートに割り当てられているアドレスで、それ意外のアドレスを指定するとインターネット上のどこかのサーバに接続しに行ってしまうので注意してください。
192.168.1.xxなどが、ご家庭のLANで良く使用されるプライベートアドレスではないかと思います。
| プライベートアドレス |
|---|
| 10.0.0.0~10.255.255.255 |
| 172.16.0.0~172.31.255.255 |
| 192.168.0.0~192.168.255.255 |
※ <>を全角<>に置き換えています。コピペの際は注意してください。
#include <WiFi.h>
#include <WiFiAP.h>
#include <WiFiClient.h>

const char *ssid = "STAMP-PICO";
const char *password = "STAMP-PICO";

WiFiServer server(80);

void setup() {
  WiFi.softAP(ssid, password);
  IPAddress Ip(192, 168, 10, 10);     // Server IP を固定
  IPAddress NMask(255, 255, 255, 0);  // Server SubNetMask
  WiFi.softAPConfig(Ip, Ip, NMask);   // IP , Gateway , SubNetMask
  IPAddress myIP = WiFi.softAPIP();
  server.begin();
}

void loop() {
  WiFiClient client = server.available();   // listen for incoming clients
  if (client) {                             // if you get a client,
    String currentLine = "";                // make a String to hold incoming data from the client
    while (client.connected()) {            // loop while the client's connected
      if (client.available()) {             // if there's bytes to read from the client,
        char c = client.read();             // read a byte, then
        if (c == '\n') {                    // if the byte is a newline character
          if (currentLine.length() == 0) {
            client.println("HTTP/1.1 200 OK");
            client.println("Content-type:text/html");
            client.println();

            client.println("<html><head></head><body><font size=+4>HELLO!!<br> M5Stamp PICO</font></body></html>");
            break;
          } else {    // if you got a newline, then clear currentLine:
            currentLine = "";
          }
        } else if (c != '\r') {  // if you got anything else but a carriage return character,
          currentLine += c;      // add it to the end of the currentLine
        }
      }
    }
    client.stop();
  }
}
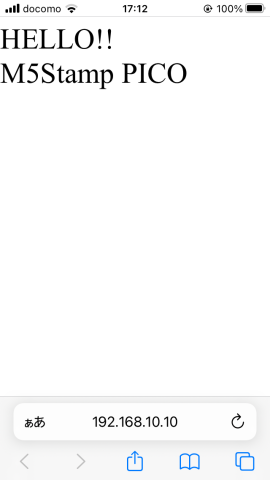 WiFiアクセスポイント STAMP-PICOに接続して
IPアドレス:192.168.10.10 にWebブラウザでアクセスすると
←が表示されます。
複数接続
M5Stamp PICO同士でデータ通信を行うのにHTTPは大げさなのでCSVでデータを送信します。HTTP通信ではないのでTerminalポート(23番ポート)を使用します。
※ポート番号はどこでも構わないですが、一応意味があるので。
毎回通信を切断するのも面倒なので、接続は維持したままにします。
WiFiClient client がクライアントソケットを包括しているクラスなので、コレはloop()内にあるとloop()を抜けた瞬間に接続が切れてします(Socketが解放される)ので、グローバル変数にして複数(今回は4個:内使用するのは2個)設定します。
LEDを2個付けて、クライアントからのコマンド LED1:ON、LED1:OFF、LED2:ON、LED2:OFFでON/OFFするようにします。
処理状態が分からないと困るので表示用にSSD1306(I2C接続)を付けておきます。
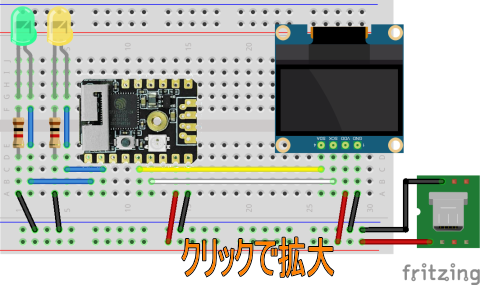
※Tiny4kOLEDの文字フォントを使用しています。
※ <>を全角<>に置き換えています。コピペの際は注意してください。
// M5Stamp PICO TCP/IP Termianl Server 1
// 1対n接続 Terminal

#include <Arduino.h>
#include <WiFi.h>
#include <WiFiClient.h>
#include <WiFiAP.h>

//#define OLDMONITER

#ifdef OLDMONITER
#include "OLED.h"
// OLED用
char str[80] ;
OLED oled ;
#endif

// Server側:SSIDとパスワード
#define SERVERPORT 23
const char* ssid     = "STAMP-PICO";
const char* password = "STAMP-PICO";

WiFiServer server(SERVERPORT,4);  // Terminal Port:最大接続数4

#define ListenMax 4
#define BuffMaxLen 80
WiFiClient client[ListenMax] ;
int readBuffLen[ListenMax] ;
char readBuff[ListenMax][BuffMaxLen] ;

#define LED1 26
#define LED2 18
int led1Stat ;
int led2Stat ;
bool flagChangeLedStat ;

// コマンド解析
void comanExec(char *commanLine) {
  char command[BuffMaxLen] ;
  int commandNo = 0 ;
  int commandNo2 = 0 ;
  int commandLen = 0 ;
  int readLen = 0 ;
  memset(command,0,BuffMaxLen) ;
  while(commanLine[readLen] != '\0') {
    if (commanLine[readLen] == ',') {
      readLen ++ ;
      commandLen = 0 ;
      memset(command,0,BuffMaxLen) ;
      continue ;
    }
    if (commanLine[readLen] <= ' ') {
      readLen ++ ;
      continue ;
    }
    if (commanLine[readLen] == ':') {
      readLen ++ ;
      commandLen = 0 ;
      break ;
    }
    command[commandLen] = commanLine[readLen] ;
    commandLen ++ ; readLen ++ ;
  }

#ifdef OLDMONITER
  sprintf(str,"CMD:%s",command) ; oled.Print(str) ;
#else
  Serial.print("Command1:") ;
  Serial.println(command) ;
#endif

  if (strcmp(command,"LED1") == 0) { commandNo = 1; }
  else if (strcmp(command,"LED2") == 0) { commandNo = 2; }

  commandLen = 0 ;
  memset(command,0,BuffMaxLen) ;
  while(commanLine[readLen] != '\0') {
    if (commanLine[readLen] == ',') {
      readLen ++ ;
      commandLen = 0 ;
      memset(command,0,BuffMaxLen) ;
      continue ;
    }
    if (commanLine[readLen] <= ' ') {
      readLen ++ ;
      continue ;
    }
    if (commanLine[readLen] == ':') {
      readLen ++ ;
      commandLen = 0 ;
      break ;
    }
    command[commandLen] = commanLine[readLen] ;
    commandLen ++ ; readLen ++ ;
  }

  if (strcmp(command,"ON") == 0) { commandNo2 = 1; }
  else if (strcmp(command,"OFF") == 0) { commandNo2 = 2; }

#ifdef OLDMONITER
  sprintf(str,":%s",command) ; oled.Println(str) ;
#else
  Serial.print("Command2:") ;
  Serial.println(command) ;
  Serial.print("commandNo2:") ;
  Serial.println(commandNo2) ;
#endif

  for (int i=0;i<BuffMaxLen;i++) {
    if (command[i] == '\0') break ;
  }
  switch (commandNo) {
  case 1:
    flagChangeLedStat = true ;
    if (strcmp(command,"ON") == 0) {
      led1Stat = HIGH ;
    } else {
      led1Stat = LOW ;
    }
    digitalWrite(LED1,led1Stat) ;
    break ;
  case 2:
    flagChangeLedStat = true ;
    if (strcmp(command,"ON") == 0) {
      led2Stat = HIGH ;
    } else {
      led2Stat = LOW ;
    }
    digitalWrite(LED2,led2Stat) ;
    break ;
  }

}

// セットアップ
void setup() {
  // ---- LED設定
  led1Stat = LOW ;
  led2Stat = LOW ;
  flagChangeLedStat = false ;
  pinMode(LED1,OUTPUT) ;
  pinMode(LED2,OUTPUT) ;
  digitalWrite(LED1,led1Stat) ;
  digitalWrite(LED2,led2Stat) ;

  // ----- 受信バッファ初期化
  for (int i=0;i<ListenMax;i++) {
    readBuffLen[i] = 0 ;
    readBuff[i][0] = '\0' ;
  }

  // ----- Wi-Fi AP設定
  WiFi.softAP(ssid, password);  // Server APを設定
  IPAddress Ip(192, 168, 10, 10);     // Server IP を固定
  IPAddress NMask(255, 255, 255, 0);  // Server SubNetMask
  WiFi.softAPConfig(Ip, Ip, NMask);   // IP , Gateway , SubNetMask
  IPAddress myIP = WiFi.softAPIP();   // APを開設
  server.begin(); // Server Soket Listen開始

#ifdef OLDMONITER
  // ---- OLED
  oled.init();
  sprintf(str,"WIFI ACCESS POINT") ; oled.Println(str) ;
  sprintf(str,"Please connect:%s",ssid) ; oled.Println(str) ;
  sprintf(str,"Then access to:%s",myIP.toString()) ; oled.Println(str) ;
#else
  Serial.begin(9600);
  Serial.println("WIFI ACCESS POINT");  //print string.
  Serial.printf("Please connect:%s \nThen access to:",ssid);
  Serial.println(myIP);
#endif
}

// 処理ループ
void loop() {
  bool flagSendLedStat = flagChangeLedStat ;
  flagChangeLedStat = false ;
  for (int i=0;i<ListenMax;i++) {
    if (client[i].connected()) {
      // 接続済チャンネルの処理
      if (client[i].available()) {  // if there's bytes to read from the client.
        char c = client[i].read();  // store the read a byte.
        // client[i].print(c) ;  // ECHO BACK
        if (c == '\n') {
          // コマンド受信
          comanExec(readBuff[i]) ;

          readBuffLen[i] = 0 ;
          readBuff[i][readBuffLen[i]] = '\0' ;
        } else {
          readBuff[i][readBuffLen[i]] = c ;
          if (readBuffLen[i] < BuffMaxLen - 1) {
            readBuffLen[i] ++ ;
          }
          readBuff[i][readBuffLen[i]] = '\0' ;
        }
      }
      if (flagSendLedStat) {
        client[i].print("LED1-STAT:") ;
        if (led1Stat == HIGH) {
          client[i].println("ON") ;
        } else {
          client[i].println("OFF") ;
        }
        client[i].print("LED2-STAT:") ;
        if (led2Stat == HIGH) {
          client[i].println("ON") ;
        } else {
          client[i].println("OFF") ;
        }
      }
    } else {
      // 未接続チャンネルの処理:接続待ち
      client[i] = server.available();       // listen for incoming clients.
      if (client[i]) {                      // if you get a client.
        while (!client[i].connected());
        client[i].println("Hello!") ;

#ifdef OLDMONITER
        sprintf(str,"New Client:%s",client[i].remoteIP().toString()) ; oled.Println(str) ;
#else
        Serial.print("New Client:");
        Serial.println(client[i].remoteIP());
#endif
      }
    }
  }
}
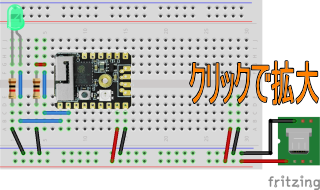
クライアントはタイマーでLチカするタイプと、ボタンを押す毎にON/OFFするタイプの2種類
| |
|
 |
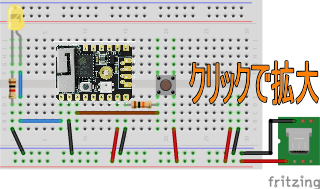 |
※クライアントはどちらのタイプでも大差ないので、リストはタイマーでLチカするタイプです。
※ <>を全角<>に置き換えています。コピペの際は注意してください。
// WiFi Remote Lチカ・クライアント

#include <WiFi.h>

//#define OLDMONITER

#ifdef OLDMONITER
#include "OLED.h"
// OLED用
char str[80] ;
OLED oled ;
#endif

#define SERVERPORT 23
const char* ssid     = "STAMP-PICO";
const char* password = "STAMP-PICO";
const char* host = "192.168.10.10";

#define LED_PIN 26
#define ID_PIN 36
int ledVal = HIGH ;
int clientID = 0 ;

#define BuffMaxLen 80
int readBuffLen = 0 ;
char readBuff[BuffMaxLen] ;

WiFiClient client;

void setup()
{
  delay(10);

  pinMode(LED_PIN,OUTPUT) ;
  digitalWrite(LED_PIN,LOW) ;
  pinMode(ID_PIN,INPUT) ;
  if (digitalRead(ID_PIN) == LOW) {
    clientID = 1 ;
  } else {
    clientID = 2 ;
  }

#ifdef OLDMONITER
  // ---- OLED
  oled.init();
  sprintf(str,"Connecting to:%s",ssid) ; oled.Println(str) ;
#else
  Serial.begin(9600);
  Serial.println();
  Serial.println();
  Serial.print("Connecting to ");
  Serial.println(ssid);
#endif

  // We start by connecting to a WiFi network
  WiFi.begin(ssid, password);
  while (WiFi.status() != WL_CONNECTED) {
    delay(500);
#ifdef OLDMONITER
    oled.Print(".");
#else
    Serial.print(".");
#endif
  }

#ifdef OLDMONITER
  oled.Println("WiFi connected");
  oled.Println("IP address: ");
  sprintf(str,"%s",WiFi.localIP().toString()) ;
  oled.Println(str);
#else
  Serial.println("");
  Serial.println("WiFi connected");
  Serial.println("IP address: ");
  Serial.println(WiFi.localIP());
#endif
}

void loop()
{
  if (WiFi.status() != WL_CONNECTED) {
    // WiFiが切れてたら再接続
    WiFi.begin(ssid, password);
    while (WiFi.status() != WL_CONNECTED) {
      delay(500);
#ifdef OLDMONITER
      oled.Print(".");
#else
      Serial.print(".");
#endif
    }
#ifdef OLDMONITER
    oled.Println("connecting to ");
    sprintf(str,"%s",host) ;
    oled.Println(str);
    oled.Println("IP address: ");
    sprintf(str,"%s",WiFi.localIP().toString()) ;
    oled.Println(str);
#else
    Serial.print("connecting to ");
    Serial.println(host);
    Serial.println("IP address: ");
    Serial.println(WiFi.localIP());
#endif
  }

  // Use WiFiClient class to create TCP connections
  if (!client.connected( ) ) {
    if (!client.connect(host, SERVERPORT)) {
#ifdef OLDMONITER
      oled.Println("connection failed");
#else
      Serial.println("connection failed");
#endif
      return;
    }
  }

  // This will send the request to the server
  ledVal = (ledVal == HIGH) ? LOW : HIGH ;
  digitalWrite(LED_PIN,ledVal) ;

  sprintf(str,"LED%d:%s\n",clientID,((ledVal==HIGH)?"ON":"OFF")) ;
  client.println(str);
#ifdef OLDMONITER
  oled.Print("SEND ");
  oled.Println(str);
#else
  Serial.print("SEND ");
  Serial.println(str);
#endif

  for (int w = 0 ; w < 6 ; w++) {
    delay(500);
    // Read all the lines of the reply from server and print them to Serial
    while(client.available()) {
      char c = client.read();  // store the read a byte.
      if (c == '\n' || readBuffLen+1 >= BuffMaxLen) {
        readBuff[readBuffLen] = '\0' ;
        readBuffLen = 0 ;
#ifdef OLDMONITER
      oled.Println(readBuff);
#else
      Serial.println(readBuff);
#endif
      } else {
        if (c >= ' ') {
          readBuff[readBuffLen] = c ;
          readBuffLen ++ ;
        }
      }
    }
  }
}
見て分かり易いLチカで試しましたが、LEDの状態の代わりにセンサーの値を送信すれば、無線接続センサーが作れます。
